For sure I am a travel addict. I am also lucky to have studied, worked and lived in various places around the world. My current stop is Singapore which is an excellent base for discovering South East Asia, a region full of hidden gems, diverse cultures and natural beauties. But I am no touristy-site hopper: when I travel, I try to look for small things, easily overlooked corners and places that are off the beaten paths. Small towns and cities are my favourite. It is in such places that you will find the most authentic food, untainted by the need to internationalize and commercialize, identify the unique aspects in the local way of life, and of course, meet the most friendly people who make your experience unforgettable. And I would rather spend more time in less places so as to give myself enough time to have a feel for whatever places I go to.

Interestingly, the more I travel overseas, the more I realize how little I knew about my country (I come from Vietnam), hence the need to go home and discover. Have you ever felt the same way? These days I try to make use of my limited holidays to explore what Vietnam has to offer. A highlight of this blog will thus be my travel experience in Vietnam and I hope it will be useful to travellers like yourself.

Enjoy!

P.S. Check out my tripadvisor reviews at http://www.tripadvisor.com/members-reviews/youngnfree

Convert vector drawing (.svg) to AutoCAD (.dxf) with Inkscape

Monday, October 20, 2014

Recently I wanted to use a CNC machine to carve out a drawing I had in vector format. A CNC machine normally works with .dxf file so I had to find a way to export .svg file to .dxf format. 

Inkscape's default option to Save As > Desktop Cutting Plotter (AutoCAD DXF R14) (*.dxf) will result in an empty AutoCAD drawing. It took me a while to figure how to fix it, but thanks to MrGoon, I finally have a straightforward solution.

1. Open SVG file in Inkscape
For the sake of exercising, you may download a free SVG file that I used here.

2. File > Export Bitmap


3. In Export Bitmap window, specify a high resolution, such as 600dpi. This will create a PNG file.


4. Open the PNG file in GIMP


Steps 5 to 8 essentially erased everything but the black outlines.

5. Select by colour (black)


6. Invert selection


7. Clear selection


8. Select None


9. Copy and paste into a new Inkscape file (Change document orientation and reposition pasted image if desired.)

10. Path > Trace Bitmap


11. File > Save As .dxf

Et voila! When you open the .dxf file, you will see the black outlines appear in perfect "health".

Upcycle mason jars into organizer

Saturday, October 12, 2013

I am back with another upcycle idea. My boyfriend has been consistently buying Prego pasta sauce which comes in round jars.


It annoys me to see empty jars accumulate at the kitchen sink, unwashed, until the day I came up with a way to get rid of them. They do actually look quite neat if stacked together horizontally. Blue tack is great for securing them together.

And the result is an organizer great for storing jewellery, stationery, and other miscellaneous items.

Now the jar organizer sits proudly on my dressing table.

Creative use for colourful wine bottles

Sunday, September 22, 2013

Do you like stained glass? I adore their vibrant shades against sunlight! One of the things that I always look out for when visiting old cathedrals during my Europe travel is their stained glass windows. Sainte Chapelle chapel in Paris certainly possesses an outstanding collection of it. But if you prefer a more contemporary look, Zurich's Grossmünster offers delightful works materialized in 2006 by German artist Sigmar Polke.

Back to the subject of this post, once I noticed that empty wine bottles have beautiful shades too, I realized that I could have a stained glass window in my own house! (a more simplistic version of course, but aesthetically pleasant enough to make me happy with the results). It is a great way to re-purpose old bottles, I must say.

Here's how you can do it:

1. Remove wine labels

  • This process takes time, although it does not require anything special other than plunging the bottles into a bucket with enough water to completely soak the labels.
           Tip: Fill the bottles to at least 2/3 full so that they will sink to the bottom of the bucket.
  • After 2 full weeks, most labels can come off easily with a gentle peel.
  • Labels that were glued with a tougher adhesive may take another 1-2 weeks but eventually they will detach. If you are impatient, get a hard brush and start scrubbing, but it can be messy to do so.
  • I don't like to use soap since water alone is enough to detach the labels anyway.

2. Once labels are removed, wash and dry the bottles.

3. Use craft wires to tie the neck and base of the bottles to a support structure or in my case, a window grid.

You can also hang the bottles from the ceiling if you have better equipments.

Enjoy the lovely view when that bright sunlight shines through the bottles!

From Hanging Bottles

A lemongrass affair

Sunday, July 7, 2013

Lemongrass's unique and vigorous scent fascinates me. So much so that I decided to grow it indoor so that whenever I need it to cook some Vietnamese dishes or make Thai lemongrass drink, it would be just a grab away. The grass has not responded well to my enthusiasm, sadly, but I am determined to make it grow for the third time now, and I think I am getting the hang of it.

First attempt
Google taught me that people can grow their own lemongrass out of supermarket-bought stalks. I selected some stalks still having a rather fresh root portion and plunged them into a glass of water. Within a week, new roots started coming out, followed by a couple of new shoots.


Needless to say, I was thrilled. I waited till the stalks are about three-week-old before planting them in potted soil in the apartment corridor.


Unfortunately, the corridor is very windy during day time so the fragile unkempt leaves had a hard time coping. This, in addition to the lack of direct sunlight, eventually led to the plants being dried up.


Second attempt
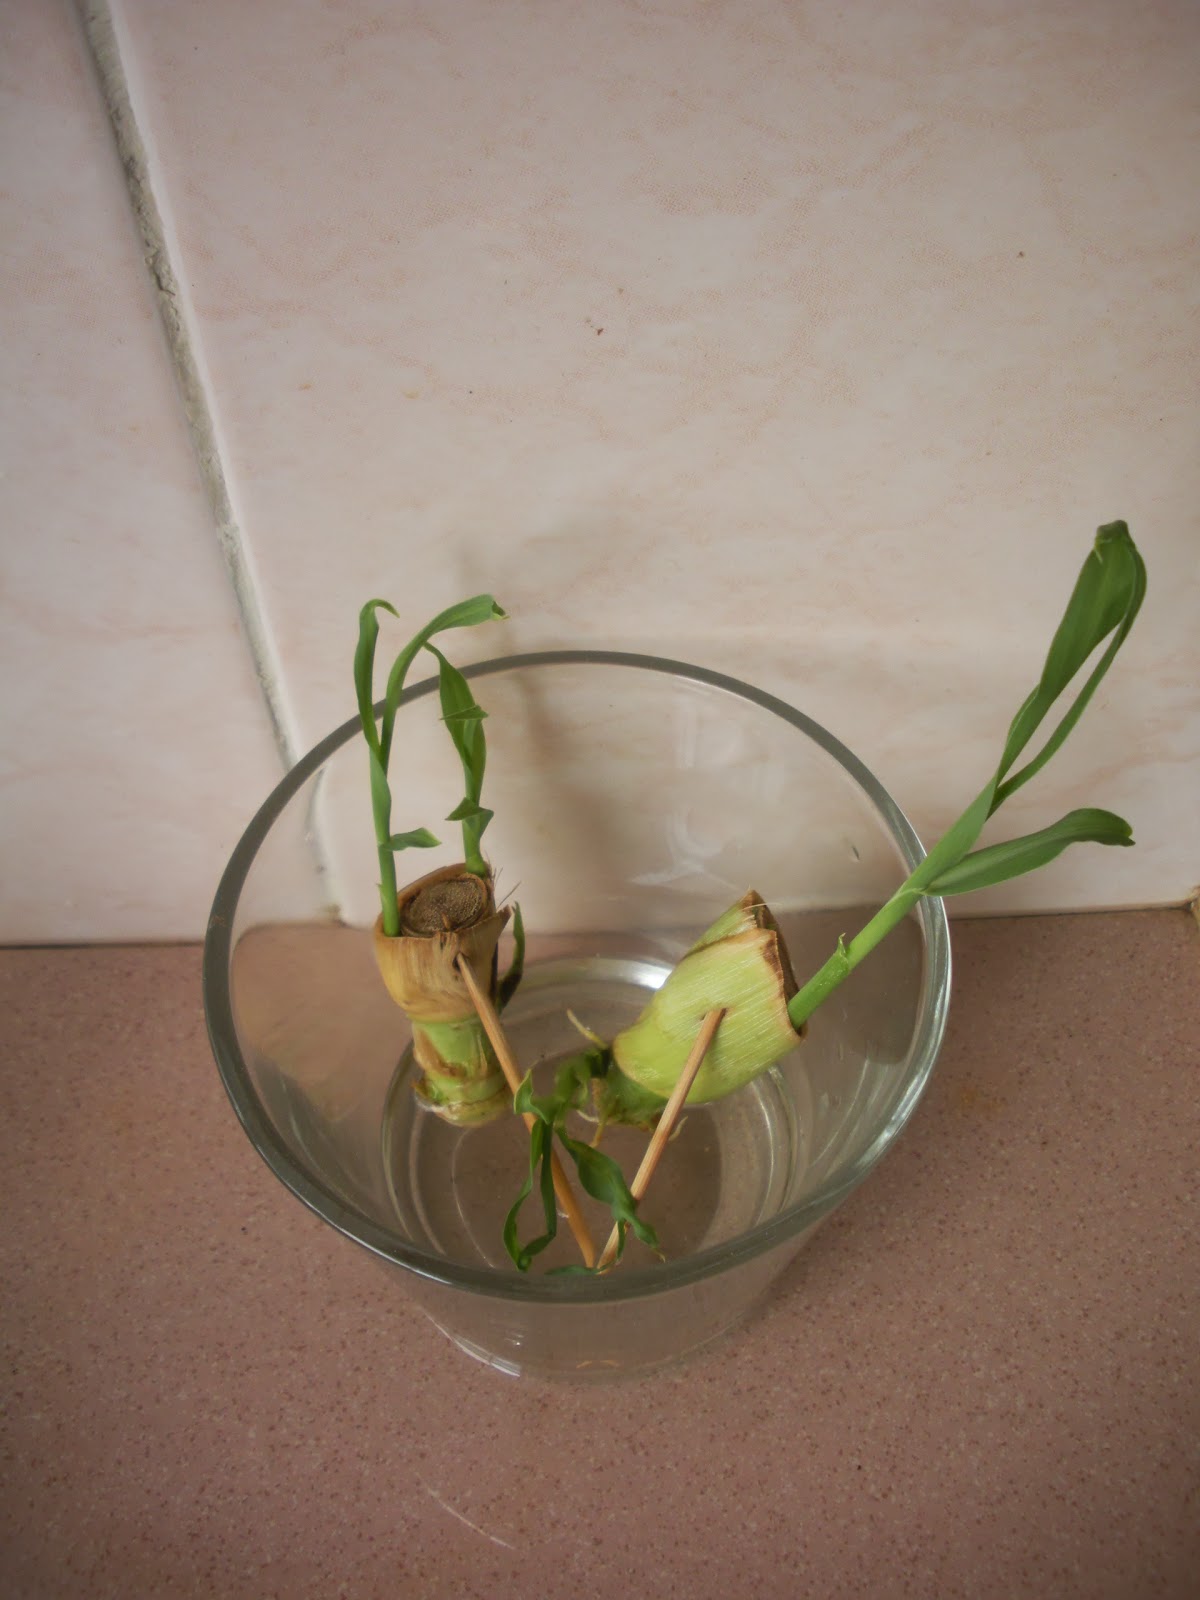
From my earlier attempt, I noticed that the plant's energy is spent on growing leaves out of the existing stalk instead of developing new shoots. In the second attempt, I removed the upper, usable part of a stalk and submersed only the 4-5 cm root. Three to four days later, I could see new shoots emerging from the base. An added benefit of this is that you are still able to make full use of the upper part for cooking. Other the other hand, root growth is significantly less robust than observed in the previous attempt.

Tip: Toothpicks can be used to make the short stump stand up in water.


Just as I was ready to pot it, to my dismay, the tips of the young leaves started browning. My best guess was that it was infected with fungi. The base went moldy eventually and once again, my dream of having home-grown lemongrass went down the drain. 


Third attempt

This time, I learnt to watch out for stalks with a build-up of blackish soot-like layer (fungi I suppose?) at the stalk's base and immediately separate them from the healthy ones. In addition, I decided that my shaded and windy corridor is not a good place for lemongrass and I have potted them in a brighter area in the kitchen. Let's see how it goes and in a couple of weeks, I will update you on its survival and hopefully further developments!!!


Tây Nguyên (Central Highlands) Discovery - Kon Tum

Saturday, June 1, 2013

As far as I was educated, Tây Nguyên mean jungles, waterfalls, ethnic people, wild animals (read: elephants) and coffee plantations in the minds of most Vietnamese. Our literature and music praise the charms of highland wilderness, of beautiful tribal girls, and the strong taste of local coffee. Exploring Tây Nguyên hence carries a romantic notion of being able to go wild and experience a rich tribal culture that still somehow survive modern times.

From my hometown Đà Nẵng, we set out to explore to Kon Tum, Pleiku, and Đắk Lắk.

Boarding a Mai Linh bus from Đà Nẵng intercity bus station at 10am, we embarked a five-hour journey to Kon Tum. The bus tickets were booked in advance at VND 170,000 per pax, and each corresponded to a seat number, but apparently, two unlucky folks who booked the tickets from two different cities, were allocated the same seat! Worse, the tiny 15-seater bus was fully booked that day. A solution was found: add a stool near the bus sliding door to make room for the extra passenger. Fortunately for us, our seats were not mixed up with other people's.

One hour into the trip, we were passing along some of the most remote mountainous areas bordering Laos. Hardly a house or farmland was in our sight. Suddenly, in the middle of nowhere, our driver started cursing when he realized none of his crews back at the bus station bothered loading a spare tire before the bus departure. I'm not sure if he realized how unwitting that was as two of his passengers obviously became a bit nervous after that ;-).

Much to our glee, our only tires endured the whole journey without going burst. We arrived in Kon Tum around 2pm, safe and sound.

Check out the route our bus took.


View Da Nang-Kon Tum in a larger map

Highlights of Kon Tum

Historically, the habitants of Kon Tum are comprised chiefly of Bana and Gia Rai (sometimes spelled J'rai) ethnic groups. In Bana language, Kon means village and Tum lake. Since Vietnam's modernisation in the early 90s, more Kinh people which make up over 85% of the country's population have arrived to settle in this quiet little town, and become the second most populous ethnic in Kon Tum.

1. Catholic seminary

Constructed by French missionaries in 1934 and served to house the first French Catholic bishop in the hill-tribe area, this lovely complex is graced by a beautiful frangipane-lined entrance and spacious garden with various displays of hill-tribe artifacts.

In present days, it houses a Vietnamese bishop, priests and priests-to-be. There is also a Hill-tribe Museum upstairs but it was locked when we went there. It is not clear when the museum is open to visitors. We tried to ask a senior resident to unlock the room who then expressed his annoyance at random tourists like us without giving us a glimpse of what could be inside.

From Tranquil Kon Tum


2. Magnificient Wooden Church

Standing on a stilt platform, the made-of-wood church was built to incorporate many hill-tribe features to appeal to its main audience, the hill-tribe villagers. Hence it is also known as Montagnard church.
From the outside, a distinct feature of the church is its rose window which depicts a "rong" house or tribal communal house and a blue elephant. Once inside, you may notice that the beautiful stained glass arts are in fact, carefully assembled decal.

From Tranquil Kon Tum


3. Kon Harachot Village

Located within walking distance from the wooden church, Kon Harachot Village offers a glimpse into the life of tribal communes in the face of urbanisation. Fortunately, it still maintains a rong house and some traditional stilted houses. Keep an open ear and you can find that the villagers still speak their own language although I'm not sure whether it is Bana or other dialects.

Add caption
From Tranquil Kon Tum


We stayed in this sleepy town for two days. My childhood memories of my own hometown came back, and I started to recall how quiet things used to be in Da Nang less than fifteen years ago. Streets with hardly any motorbikes in sight were common back then and those who are Christians never failed to put on their best clothes to go to Sunday mass. I can't help wondering what Kon Tum will be like in fifteen year's time.

IQ/OQ

Saturday, November 24, 2012

Are you writing documents such as Installation Qualification and Operational Qualification for your hardware for the first time?

I guess you are looking at this because you are not sure how to start. Neither was I, and that's when I started googling for a template or example. As it turns out, there are not so many detailed examples that you can take a look at for free, especially one that is related to machines and not just software.

Fortunately, I digged hard enough to find this wonderful gem. If you will find it helpful too, don't forget to thank folks at BioRad for making it available.

http://www.bio-rad.com/webroot/web/pdf/lsr/literature/10005250C.PDF

The less-travelled road around Hue

Sunday, November 18, 2012

If you have time and fancy a motorbike road trip around Hue, here is an itinerary of roughly 110km that can be covered in one day. We hit the road at about 8.30am and finished off at 6pm.

I know that tombs and historical monuments are the main course in everyone's plan when visiting this imperial city. But once you've gobbled up all that solemn stuff, spending a day sightseeing the city's outskirt is like enjoying a light and refreshing dessert.


View Hue in a larger map

Help yourself to some photos taken along the way.

Incremental Encoder Pulse vs Count

Sunday, May 27, 2012

As a robotics engineer, I frequently work with packaging applications. Often, this includes having robots follow parts on a moving conveyor. This is possible with the use of encoders. Once an object is identified by a camera or a sensor, a trigger signal is sent to an encoder which then starts measuring the distance the object travels along the conveyor. Armed with this information, robots can predict when the object will get into their work area and chase after it.

Typically, the number one criterium when selecting an encoder for your application is resolution (or number of pulses per revolution of encoder shaft).

Naturally, you would want to select the highest resolution within your budget. The more, the better right? But that is not necessarily the case, as it depends on how frequent the receiving device can take in encoder pulses. Hence you need to pay attention to the minimum and maximum limits for the number of encoder pulses or counts such device can accommodate. In turn, this affects the size of your encoder wheel as well (if your encoder is wheel-mounted, as opposed to drive shaft-mounted).

At one point, I thought that the terms pulse and count refer to the same thing, but they don't. The fact is

Number of Counts =  Number of Quadrature Pulses x 4

You may also want to know that

Number of Counts Per Meter (CPM) 
             = Number of Wheel Revolutions per meter x Encoder Resolution x 4
Number of Counts Per Second        
             = CPM x Conveyor speed (m/s)

For those who want to understand various types of encoders, incremental versus absolute encoders, magnetic versus optical encoders, and more, below is an easy read from encoder manufacturer Dynapar. Just click on the picture.

From Delicious to Diigo

Sunday, October 30, 2011

Like everyone who does a lot of web search, I like to bookmark web links for future reference. For years, I've trusted Delicious's friendly social bookmarking service until the most recent change of ownership messed it up almost completely. Unfortunately, I maintained the Delicious account using an email address that I do not check very often, so when AVOS sent a notification email about the deadline to transfer existing bookmarks to another service, I was oblivious! But who would have ever thought a service as useful and as popular as Delicious would one day be discontinued like that.

In case anyone also faces the harsh reality of having missed AVOS's deadline, I will share my exodus journey from Delicious to Diigo, another bookmarking site.

1. Access the old Delicious servers to retrieve your bookmarks, as described at:
http://gabrielleabelle.livejournal.com/337468.html

To know how to edit host files on Mac OS X, refer to:
http://www.switchingtomac.com/tutorials/how-to-edit-the-hosts-file-in-os-x

As of Oct 30th 2011, it's still possible to access these servers. You will be prompted to log in with your Yahoo username and password. After this, you will arrive at a plain looking page.


2. Export bookmarks in .htm format by going to Settings. Under Bookmarks, select Export/Backup Bookmarks.


3. Import the htm list to Diigo. In Diigo, go to Tools (top right corner menu). Under Web Services, select Import bookmarks and browse to the .htm list.

Et voila, you have rescued all your Delicious bookmarks, together with tags, to Diigo!

What an unnecessary hassle and waste of time you might say. But hey, I am actually relishing the fact that with Diigo toolbar Add-on for Firefox, any bookmark I save from now on can be set as "private by default". Delicious never made this feature available to its users, despite numerous appeals.


P.S: Prior to attempting the above method, I followed another advice at http://leo.gaggl.com/2011/10/export-delicious-bookmarks-in-xml. It gave me a .xml list of exported bookmarks which Diigo had troubles importing. Specifically it says "Oops. Something wrong. Please check the file size and format. Don't hesitate to contact us (with your diigo user name) if you still experience problems."

Hải Vân Pass

Wednesday, February 23, 2011

Hải Vân (literally translated from Vietnamese: Ocean Cloud) Pass marks the border between Đà Nẵng City and Thừa Thiên-Huế Province, Vietnam. Prior to 2005, this pass, especially dangerous during rainy days or otherwise foggy weather at dusk, used to be the only way to traverse between the North and South of Vietnam. Since then however, Hai Van Tunnel, built between 1998 and 2005, has taken over the role of the pass as the primary transportation linkage. Banned from tunnel access, motorbikes, gas tankers and carriers of live animals, as well as some tourist coaches are among the few vehicles frequenting the pass nowadays.

What it means for tourists is that there is very little traffic on the pass, which would make for a lovely motorbike sightseeing trip at your own pace. Although I am overseas most of the time, I do ride on motorbike whenever I am back to Vietnam. Most recently, during Tết (Vietnamese New Year holiday), Nicolas and I decided to travel to Hue for a few days, and we wanted to do that via Hai Van Pass, on a motorbike, motivated by praising words of gorgeous sights from travellers who have taken this route.

View of the Hai Van Pass in the direction towards Hue, taken at the top of the Pass. The highest point is said to be 496m from sea level.
Too bad when I mentioned this, my parents objected right away, unconvinced of my ability to handle the pass's twisting bends, especially with a heavier person behind. There are also rumours about the risks of falling victims to road crimes due to lack of road patrols and traffic in general. ... We ended up arranging for a car with a driver that would take us all the way to Hue's city centre, not skipping the Pass of course. This set us back by US$ 55.

It was a beautifully clear and sunny day in February when we departed. Seeing that road visibility was excellent, and that there was a reasonable number of motorbikes braving the road, I actually regretted not doing it myself!

Traffic on Hai Van Pass (Photo credit: Nicolas Boichat)
I think many of those people must be going from Da Nang to Hue and vice versa to visit their relatives, as part of our Tet customs. Completing the pass on a day like this takes as fast as 30 minutes to as long as a little over an hour, depending on how long you stop for photo-taking.

I will definitely keep this road trip in mind for next time, if the weather is favourable and the timing is neither too early nor late (just a safety precaution).

Shop houses at the top of the pass. There is a post office too but I don't know whether the service there is reliable.

Recover Picasa albums from backup files

Saturday, January 29, 2011

I've been using Picasa for more than 2 years now. It's a pretty neat tool (especially considering that it's free!) to sort photos and quickly upload to Facebook. Recently though, the hard drive of my Macbook failed and I had to re-install the OS which led me to figure out how to recall files that have been backed up by various applications, including Picasa.

1. To recover a lost album, first locate its most recent backup file (with a .pal extension) or that of any other date you prefer. On my Mac, it's in User/Library/Application Support/Google/Picasa3/Picasa3Albums/backup.

In the same directory, there should be another folder with a funny name (like ce5639026adb24fbfbfb4dded3c37e4f). This is the current database; it contains information about all the albums (or none) that should appear in Picasa if you are to start the application immediately. This is saved from your last Picasa session. In case no such folder exists, just open and close Picasa to generate one.

2. In the backup folder, there are many sub-folders each named after a certain date where some activities take place in Picasa. Each folder has some .pal files with very cryptic names such as 95a8b8e741e769511d518d04410be0c1.

To know which .pal file refers to the album you're looking for, open them one by one with a text edit application. You will see that listed are the paths that lead to all pictures in that album. For example, $Pictures/Planets/Jupiter.JPG/.

Also take note of the database ID (abbr: DBID) provided at the second line from the top of the document, e.g: 2e2bcb8311ab2ed72895a05958ac435f.

3. Make sure Picasa is not already on. Copy the appropriate .pal file(s) into the current database folder mentioned previously.

4. Launch Picasa and you should see your lost album re-appear!

What happened is that when Picasa is launched, it will look into the current database folder to find which .pal files have a different DBID from the current database, and update those into the new session. When the session is terminated, the foreign DBID is then converted to that of the current ID.

If your album is lost because you have moved the pictures that belong to it, you will need to edit the paths contained in the associated .pal file. For more details, refer here